Friday, February 05, 2021

ADF Data flows - Minimize Cluster Warm-up Times

Azure Data Factory Data Flows is a cool feature that implements SSIS like data flow transformations within ADF that harvests the power of Apache Spark. It provides familiar interface to set Source and Target and other transformations such as Joins, Derived Columns and Filter, but with scalability you can achieve to process billions of rows using spark clusters.

If you have worked with mapping data flows, the type of data flows that implements SSIS like transformations, you should already know that each data flow requires it's own spark cluster to run. By default, once a data flow finishes executing it's job, it will be deallocated from the cluster and the next data flow requires to be allocated to an available cluster (if not spin up a new cluster) which is the warm-up time that you see in the beginning of each data flow execution.

This warm up time can vary from 5 to sometimes 7 minutes. If you have sequentially connected data flows in your ADF pipeline, these warm-up times that are in between every data flow can affect the overall execution time of the pipeline. (Check below screenshot)


One way to overcome this is to connect data flows in parallel so that they will only have that initial warm-up time as all the parallel data flows will be allocated to their own clusters.

However if that is not an option, the solution is to set "Time To Live" setting in the Azure Integration Runtime that you assign to the data flows in the ADF pipeline. This will make sure the cluster stays alive after the data flow finishes executing and the next data flow can be allocated to the same cluster. This definitely brings down the cluster warm-up time down to less than 3 minutes.

Something to note is that this setting cannot be modified for the default AutoResolveIntegrationRuntime. Therefore, you will need to create a new Azure Integration Runtime in the correct region and select this setting (see screenshot). Once created, select this integration runtime for each data flow in the ADF pipeline.

Hope this helps!


Thursday, February 01, 2018

Power BI and Slowly Changing Dimension Type 2, selecting the right member based on the date

A recent BI project, that had a Slowly Changing Dimension (SCD) type 2 for their customers, used Power BI as it's visualization tool and the client wanted to get counts that were true based on the dates they selected. After trying out various methods, I finally used the following,

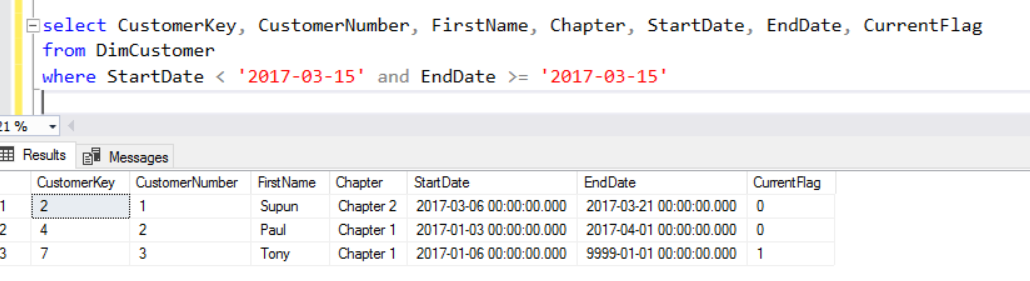
I've created a sample dimension table to show how it's done. Below is how it looks like,


The SQL Query that would select the correct records based on the date would look like below,


The client wanted to select a date range and Power BI should show distinct count of members that are current based on the end date selected. Below are the steps I used to achieve this,

Note: There is a seperate date dimension called dimDate that's used in date filters.

Step 1: Create a measure that will get the max date selected


I have used two functions, MAXX and ALLSELECTED. ALLSELECTED will disregard any context set by the dimCustomer dimension.

Step 2: Create another measure for the counts.

I will be using the CustomerNumber column to count the customers.

I'm using a variable here to avoid context transition and the max date value will stay unchanged for all the customer records.

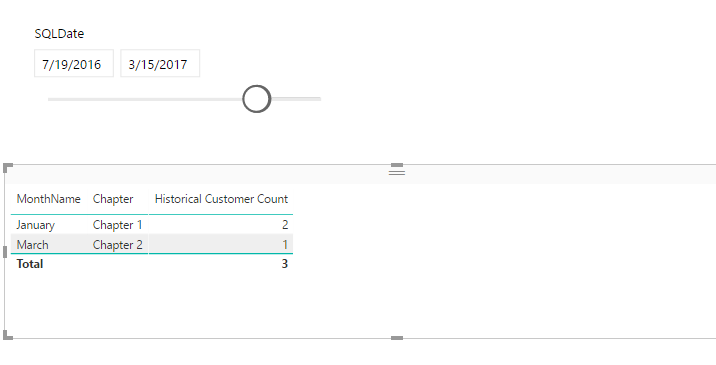
Step 3: using the Date slicer and the new measure in a table


To look at the detailed records, i included the CustomerNumber column as well


Hope this is helpful. Please let me know what you think and if there are better ways of doing this.

Cheers!

Saturday, January 27, 2018

Installing prerequisites for Master Data Services (MDS) failing with error code 0x800F081F

Recently I wanted to try out SQL Server 2017 Master Data Services and started to install the pre-requisites. It requires IIS feature/ role to be added before configuring MDS databases and the web application. I was using Windows 10 and when I selected all the components required from add features dialog and started to install using Windows Update option (it now defaults to downloading required files from Windows Update), it fails with the error code: 0x800F081F (I had an active internet connection).

After searching for sometime I found a work around to use Windows Media disk or ISO file as the source, instead of connecting to internet and downloading the required files.

Step 1 : Create Windows Media ISO using Windows Media Creation tool

Download the tool from here fore Windows 10
https://www.microsoft.com/en-ca/software-download/windows10

Run the exe file and follow the instructions to create an ISO file of the currently installed windows version.

Step 2: Mount the media ISO
Once the ISO is created, mount it.

Step 3: Change group policy to add Alternate Source File Path

Follow the instructions in the following article under the section "Set Group Policy" to specify an alternate source file path that points to the mounted ISO.

https://docs.microsoft.com/en-us/windows-hardware/manufacture/desktop/configure-a-windows-repair-source

It usually is,

:\sources\sxs

Step 4: Update the group policy
Run the following command to apply changes to the group policy,

gpupdate /force

Note: if the computer is in a domain, make sure you have access to the domain controller, usually through a VPN connection.

Step 5: try adding the features again
This time, hopefully, you are not prompted to select windows update, instead, it will locate the files from the location you specified and install the features.

Once the features are successfully installed, don't forget to reset the policy settings.

Cheers!

Wednesday, March 12, 2014

SSDT 2012 Database Project Limitation with Change Tracking - using CHANGETABLE in inline table valued function

I recently worked on a SQL Server Data Tools (SSDT) 2012 database project that had Change Tracking enabled. There were a lot of stored procedures and functions written using the CHANGETABLE() function to retrieve changes. Also, there were a few inline table valued functions written to select records from CHANGETABLE(), that would look like something below,

CREATE FUNCTION [dbo].[fn_MsBuildTest]
()
RETURNS TABLE AS RETURN
(
select ID
from CHANGETABLE(changes dbo.TBL1_DTL , 1) as CT
)

It basically selects IDs of dbo.TBL1_DTL table from the CHANGETABLE() function.

When I built the project within visual studio, it built without any errors or warnings. However the issue came up with the project was built using TFS build. The build failed with the following error,

"F:\Documents\Personal\Projs\DB\RecoverTest\RecoverTest\RecoverTest.sqlproj" (r
ebuild target) (1) ->
(SqlBuild target) ->
  F:\Documents\Personal\Projs\DB\RecoverTest\RecoverTest\dbo\Functions\fn_MsBui
ldTest.sql(5,9,5,9): Build error SQL71501: Computed Column: [dbo].[fn_MsBuildTe
st].[ID] has an unresolved reference to object [ID]. [F:\Documents\Personal\Pro
js\DB\RecoverTest\RecoverTest\RecoverTest.sqlproj]

It cannot identify the column ID and throws a unresolved reference error.

After digging we found out that the issue is with MSBuild. When the project was built locally, on the same computer where I successfully built the project using visual studio 2012, using MSBuild utility, the same error was thrown. So it turns out that MSBuild has a limitations building inline functions with CHANGETABLE() function used in the select statement.

To verify that, I changed the function to a multi-lined table valued functions, and here it goes. MSBuild successfully built it. Below is how it was after it has been changed to multi-lined table valued function.

CREATE FUNCTION [dbo].[fn_MsBuildTest]
()
RETURNS @changes TABLE(ID bigint)
AS
BEGIN

insert @changes
select ID
from CHANGETABLE(changes dbo.TBL1_DTL , 1) as CT

return
END

According to this experience, it turns out that if CHANGETABLE can be used in a multi-lined table valued function, but not inside a inline table valued function.


Thursday, February 06, 2014

Resolving SSRS windows authentication issue, continuous pop up of user authentication dialog and the user never gets authenticated.

Recently there has been a issue where in a test environment, one of my colleagues was having a scaled out setup of SSRS. He had dedicated virtual servers for Database, SSRS and SharePoint (SSRS was installed in SharePoint Integrated mode). After the installation he could connect to the Report Server using the default url within the same server where SSRS was installed. However, from any of the other servers, Database and SharePoint, this was not possible, as when accesses the url, the user authentication dialog continuously pops up and it never gets authenticated even though the user name and the password was confirmed to be correct.

After hours of struggling, it turned out that the issue was with the authentication settings of SSRS in the Reporting Services Config file. The below link can be used as a guide to do this.

http://technet.microsoft.com/en-us/library/cc281253.aspx

Sunday, February 02, 2014

SQL Server Data Tools - Resolving self-refereces (referencing local database objects with three part name) issue

I have been allocated to stream line the database solution management of one of the projects we had that consisted of several databases. The primary database was a Navision CRM database, and there was a Data Warehouse project consisted of several staging databases.
In some of the databases, there were database objects created such as views, that references tables from the same database using three part name,

[Current Database Name].[schema].[Local Table Name]

As the first step of the solution management, I had to create SSDT database projects by importing the schema of these databases. However I came across this issue, where you should resolve all the references to objects of different databases. Since three part names were used for local tables, SSDT treats them as external objects, and requires these references to be resolved. After reading a few articles, that explained the only work around was to remove Database Name from the table names used, which is the preferred option, I came across this workaround to resolve these self-references.

In general, to resolve external database references in SSDT database projects, we should add database reference to the project, and change the code to add SQLCMD variable in place of the database name of the three part name. SSDT provides a set of pre-defined SQLCMD variables, such as $(DatabaseName) that gives option to provide current database name.

My workaround was to replace database names of the self-references to $(DatabaseName), so that it would look like below,

[$(DatabaseName)].[schema].[Table Name]

This resolved the self-referencing issue. However, it is always a best practice to avoid three part names for local objects!

Monday, April 22, 2013

Appending to Existing Backup Set in SQL Server

When you are taking a backup of SQL Server database, you can append the backup to an existing backup set, which is the default option selected. This can be done by selecting an existing backup file (if you are using a disk backup) as the destination. Appending to an existing backup set is also possible with tape backups. Once you select the same backup file, and choose to append to an existing backup set, the new backup will be appended to the end of the previous backup.

When it comes to restoring, if you select a backup file, it will select, by default, the last backup set in the backup media. But how can we select a different backup set to be restored? Once you select the backup media for restoring, the last backup set will be selected. You can see that in the "Backup sets to restore" list, the name of the last taken backup set is shown. However, you can select a previous backup set by clicking  "Timeline" button in the "Destination" section, right above the backup set list. There you get a timeline of backup sets available in the selected media, and provides the option to select which backup set should be restored. You can simply click on the backup set, or select the date/time of the backup set based on which the correct backup set will be selected from the timeline. Once the backup set is selected, SQL Server will restore it instead of the latest.

Thursday, February 07, 2013

Hekaton from Microsoft

The project, code named "Hekaton", brings the latest in memory technology that integrates with Microsft SQL Server, and is  planned to be released with the next version of SQL Server. This promises upto 50 times performance improvement on industry level hardware. Below are some links for more information,

http://bit.ly/VTfgcC

http://bit.ly/X6ge6l

Tuesday, January 29, 2013

PowerView Add In for Excel not Detecting Silverlight, Trouble installing silverlight for Powerview Excel Add in

I came across this situation where I have enabled PowerView on excel and still it kept on saying that SilverLight is installed, even when Silverlight is installed on my computer. The reason for this is, the version of silverlight installed was the one downloaded through chrome ( or any other browser, not Internet Explorer). For powerview to work,  you need to download Silverlight through Internet Explorer and install. This would solve the problem.

Choosing between Tabular Model and Multidimensional Model

A document with detailed information on choosing the right model for the BI project. Can be download from the below link,

Click here to go to download page

Monday, January 07, 2013

SQL Server Reporting Services - Multiple Personality Syndrome with Dynamic Borders

Recently I was working with a SSRS 2012 report on a BI project and it required to have dynamic border styles for some of the tables in the the reports. SSRS gives you option to write "Expressions" for the border style property, for each side (Top, Bottom, Left and Right). So I simply wrote my expressions for each to dynamically change the border style to either "Solid" or "None" based on a condition. I ran the report in the debug mode, within Data Tool, and it was all fine. The border styles changed as expected.

However, The reports were supposed to be uploaded to a Report Server and executed through the web interface When I tested the same report via the web interface, non of my dynamic styles were present. It always had "Solid" style, in all the scenarios. I rechecked the source files, re-tested it within data tools and the report was running fine. But again, when I uploaded it to the report server and ran it through the web interface, the borders were always solid.

After hours of struggling with this tiny issue, I have found that border styles work in two different ways in data tools and web interface. The border style property has one extra property called "Default". The value that is specified here for default (None, Solid ...etc), will override all the expressions specified for each side (left, right ..etc) only when the report is run via the web interface.

Friday, March 11, 2011

Transfer Sybase SQL Anywhere IMAGE Binary data to PostgreSQL BYTEA, Part1 (using CSV)

As an update to my previous post, easy way to import images to PG, where I wanted to migrate a sybase image column to a postgresql bytea column. The method I explained there requires the image file be present in order to import it to the postgres database. But in cases where the images or documents are only available in an IMAGE column of a sybase database, I have used two methods to transfer them to a PG database.

1. From a CSV created from the sybase table
2. Using Pentaho Kettle Data Integration.

I am explaining the first method in this post, Importing the image data using CSV.

Step 1 (Export the sybase table to CSV)


First of all, we need to export the required data of the sybase table to a csv. Note that my table in sybase looks like below,

images
======
image_ID integer,
image_name varchar(50),
image_data image

Before exporting the data in the table, the images table, the image_data column should be converted to ASCII string, encoded with base64. This can be done with the inbuilt function BASE64_ENCODE() which will return a base64 string. Check the following query to get the required data set that can later be exported to csv,

SELECT image_ID, image_name, BASE64_ENCODE(image_data) FROM images.

Note that in the query, the image_data field is encoded with 64 with the above function.

Step 2 (Import csv to PostgreSQL)

Once the csv is ready, import it to the postgresql database. Note that the image_data field should be imported to a string type field of the postgresql database table. Check the table I have in PG below,

images
======
image_ID int,
image_name character varying(50),
image_text text
image_data bytea

The copy command that imports the csv into the PG table may look like below,

COPY images FROM 'C:\\PG\\images.csv' WITH QUOTE '''' CSV

Note that if the text data in your csv is quoted, then the relevant quote should be provided in the COPY command to prevent the same quote be copied into the table alone with the data. For example, if you didn't provide the QUOTE in the COPY command, you will have data like, 'company_logo', in the table. This should be avoided, specially for the base64 string.

Step 3 (Update bytea column with base64 string in the text column)

Once we have data in the images table, images saved in the text column encoded with base64, we need to update the bytea column of the same table by decoding data in the text column into the bytea format. Check the following script I have used in this example,

UPDATE images SET image_data = DECODE(image_text, 'base64');

This script decodes data in the image_text column and updates the image_data, which is a bytea column, with the correct binary data of the particular image. You can clear the image_text column later to save addition space.

It's easy as that and check out the next post, which is the PART 2 of this post, to see how we can directly transfer image data from sybase to postgresql using Pentaho Data Integration ETL package.

Wednesday, March 02, 2011

Easy way to import image to bytea field in PostgreSQL/ Postgres

During the migration of our Sybase databases to PostgreSql, I came across a small table with a few records that was used to store images used by the reports. Specially the company logos ..etc. " image " was the data type used in the sybase database and I had to store the same data in postgres data base in a " bytea " field. I tried exporting the sybase table into a csv and import the same csv to postgres which didn't give me successful results. So I had to import the actual image files(which I already had with me) into postgres and I wanted to do it without  doing any java coding. So here's the way I managed to do it,

Step 1 (convert the image to base64 string)

Using an online converter such as,  http://bit.ly/Ee6Ju, convert the image to base64 string.

Step 2 (Insert the baste64 string after decoding it into bytea)

Copy the string from the site and paste it in the PgAdmin query tool within the insert query like below,

INSERT INTO images (image_name, image_data)
VALUES( 'image_one', decode('', 'base64') );

And thats it, your base64 is converted into bytea and inserted in the bytea field of the image table.

Friday, January 07, 2011

Export JasperRerpots to Excel, Number Formats and Patterns Mapping for JasperServer and JaperReports

After a complaint I got from one of the client on some numerical formating are not applied when the reports are exported to excel, I had to look for a solution for this.
For Example,

When you apply a pattern such as "#,##0.0 %" in iReports and deploy the report on JasperServer and then export the report to excel from JS you would expect the values to be something like, "12.0%". But instead, what you find on the excel is "0.12". The reason for this is because, Java patterns in iReports should be explicitly mapped to Excel patterns or Masks in order to have them exactly the way they are on the JRXML.

How to do this in two simple Steps,

Step1,
You need to add the mappings in the applicatonContext.xml file which can be found in the following folder,

"tomcat_folder"\webapps\jasperserver\WEB-INF\

Search for the following,

<util:map id="formatPatternsMap">
<!-- entry key="¤ #,##0.00" value="$ #,##0.00"/-->
</util:map>

Add a mapping as below,

<util:map id="formatPatternsMap">
<!-- entry key="¤ #,##0.00" value="$ #,##0.00"/-->
<entry key="#,##0.0 %" value="0.00%"/>
</util:map>

Key should be the Java pattern, and the value should be the pertaining excel pattern/mask

Step2

Do Not forget to disable "detectCellType" property. To do this search for the following bean,

"xlsExportParameters"

and change the following property to false,

<property name="detectCellType" value="false"/>

Restart Tomcat for changes to take effect. After that you should be able to see your desired formatting on excel too.

Cheers!

Wednesday, December 29, 2010

Sybase SQL Anywhere Database Tracing and Profiling

While looking for a way to trace the incoming statements to one of our Sybase SQL Anywhere databases, I came across this really good post which helped me a lot. Sharing it for your reference.

To the Post

Wednesday, November 24, 2010

Integrating SharePoint and Silverlight 3

I'm working on developing Silverlight 3 web parts for SharePoint and found this article really interesting,

Link to Article

Cheers!

Tuesday, November 23, 2010

Install or Copy Assembly / dll into GAC in Vista

While doing some SharePoint stuff, I needed to make SharePoint find one of my DLLs I have used in my SharePoint web part. I was going to install the dll in my Global Assembly Cache of my Vista pc. I went to the %WINDOWS%\assembly folder and simply dragged the dll there, but it gave me an error saying "Access Denied". Then I did what I always do when I get this sort of authentication errors, I closed the explorer, then re-opened it as Administrator. Still no use. I tried to find the gacutil.exe but I couldn't find that either in my .NET Framework folders.

I had to do a bit of googling and found this way in one of the forums. You need to use the "Microsoft .NET Framework 2.0 Configuration" utility which lets you Install / Uninstall assemblies from the GAC easily. You can find this utility in the following location
"C:\Program Files\Microsoft Visual Studio 8\SDK\v2.0\Bin\mscorcfg.msc"

When you open the utility, there is a node called My Computer in the left hand pane. Expand it and click on the sub node "Assembly Cache". This will give you two options in the right hand pane, "View List of Assemblies...." and "Add an Assembly to ...". You can use the second option to add the assembly to GAC.

Hope this helps,
Cheers!

Wednesday, November 17, 2010

Import, Export, Transfer Multiple Tables with Pentaho Kettle

Working with Pentaho for the latest requirement we had on migrating sybase database to PostgreSQL, I had to find a way to Import/ Export all the tables from Sybase to Postgres and this had to be done quickly and with minimum effort. If it were SQL Server, I could go with the simple Import/ Export wizard it would have been a piece of cake. But Pentaho also has a similar approach and here's how to do it,

Step1: Create a Job in kettle.

You can do this simply going to file --? new --> Job

Step2: Create Data Connections

You need to create the source and destination database connections. You can do this in the view tab, right clicking the Data Connection and selecting New Data connection.

Step3: Open the wizard to Create the Job

Once the source and destination connections are in place, it's time to create the job that will actually copy the data. Go to Tools --> Wizards --> Copy Tables. In the first view select the source and the destination connections and press next. Then select the tables from the source connection that should be copied to the destination. In the third step of the wizard, provide details where the job and the relevant transformations should be saved. Press finish and it will create a new job with all the Create Scripts and Transformations.

Things to consider,

1. The wizard would not create Create Scripts for already existing tables in the Destination Database.
2. Based on what destination database product used, SQL Server, PostgreSQL, there might be things missing from the source database. i.e, Default Values, Identity Columns created as ordinary Numeric columns ..etc. In that case, it had better if the destination tables can be manually created.

There might be more considerations that should be taken care of, but these are what I came across.

Hope this helps!

Configure email in JasperServer with SMTP Authentication

This is an issue I came across while configuring JasperServer for emailing reports. Our mail server users SMTP Authentication. But, in the general email configuration of JasperServer (js.quartz.properties file) doesn't provide a way to put this property. But this property can be set in a different location.

In this case you need to modify a file called "applicationContext-report-scheduling.xml". This file can be found in TOMCAT Installation Folder\webapps\jasperserver\WEB-INF folder. You need to find the following tag <bean id="reportSchedulerMailSender"....

and put the following property inside it,

<property name="javaMailProperties">
<props>
<prop key="mail.smtp.auth">true</prop>
</props>
</property>

Restart tomcat and things should work fine. Refer to the following forum thread where I got the answer for my post.

Forum Thread

Monday, November 15, 2010

Transfer / Load data to PostgreSQL using SQL Server , SSIS

SSIS can be used to load, insert data to Postgres databases, but, you need the OLE DB driver for that. There is a OLE DB driver provided by Postgres, but that didn't work for me. May be I need to find more why it didn't. But in the meantime, there is this Native OLE DB Driver for Postgres which works really fine. But it is not free. You can download a demo version of the driver from here,

PostgreSQL Native OLEDB Provider (PGNP)

Once you install the driver, you can use it in SSIS, SQL Server ....etc as an ordinary OLEDB provider to directly load data to Postgres tables.

Cheers