Thursday, February 01, 2018

Power BI and Slowly Changing Dimension Type 2, selecting the right member based on the date

A recent BI project, that had a Slowly Changing Dimension (SCD) type 2 for their customers, used Power BI as it's visualization tool and the client wanted to get counts that were true based on the dates they selected. After trying out various methods, I finally used the following,

I've created a sample dimension table to show how it's done. Below is how it looks like,


The SQL Query that would select the correct records based on the date would look like below,


The client wanted to select a date range and Power BI should show distinct count of members that are current based on the end date selected. Below are the steps I used to achieve this,

Note: There is a seperate date dimension called dimDate that's used in date filters.

Step 1: Create a measure that will get the max date selected


I have used two functions, MAXX and ALLSELECTED. ALLSELECTED will disregard any context set by the dimCustomer dimension.

Step 2: Create another measure for the counts.

I will be using the CustomerNumber column to count the customers.

I'm using a variable here to avoid context transition and the max date value will stay unchanged for all the customer records.

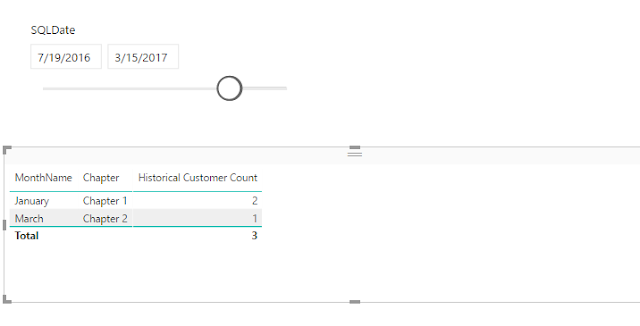
Step 3: using the Date slicer and the new measure in a table


To look at the detailed records, i included the CustomerNumber column as well


Hope this is helpful. Please let me know what you think and if there are better ways of doing this.

Cheers!

Saturday, January 27, 2018

Installing prerequisites for Master Data Services (MDS) failing with error code 0x800F081F

Recently I wanted to try out SQL Server 2017 Master Data Services and started to install the pre-requisites. It requires IIS feature/ role to be added before configuring MDS databases and the web application. I was using Windows 10 and when I selected all the components required from add features dialog and started to install using Windows Update option (it now defaults to downloading required files from Windows Update), it fails with the error code: 0x800F081F (I had an active internet connection).

After searching for sometime I found a work around to use Windows Media disk or ISO file as the source, instead of connecting to internet and downloading the required files.

Step 1 : Create Windows Media ISO using Windows Media Creation tool

Download the tool from here fore Windows 10
https://www.microsoft.com/en-ca/software-download/windows10

Run the exe file and follow the instructions to create an ISO file of the currently installed windows version.

Step 2: Mount the media ISO
Once the ISO is created, mount it.

Step 3: Change group policy to add Alternate Source File Path

Follow the instructions in the following article under the section "Set Group Policy" to specify an alternate source file path that points to the mounted ISO.

https://docs.microsoft.com/en-us/windows-hardware/manufacture/desktop/configure-a-windows-repair-source

It usually is,

:\sources\sxs

Step 4: Update the group policy
Run the following command to apply changes to the group policy,

gpupdate /force

Note: if the computer is in a domain, make sure you have access to the domain controller, usually through a VPN connection.

Step 5: try adding the features again
This time, hopefully, you are not prompted to select windows update, instead, it will locate the files from the location you specified and install the features.

Once the features are successfully installed, don't forget to reset the policy settings.

Cheers!